Printing Letters
Connect Toolkit
This guide will show you how to print letters to your voters. Delivering letters to voters allows you to deliver a more personal message, which is more likely to get read and can be tailored to groups of voters. The ‘Letters’ button is found in the icons at the top of the My List Screen. You will need to have already created a List to print letters.
You will need to have the body of your letter already saved into the Template Letter sections of Connect which requires Senior Activist access or above. For a good looking letter you will want to invest in a pre-printed letterhead with a photo, contact details, imprint, bar chart and blue signature on it to over print these letters on to.
NOTE: You can set a default footer (such as an imprint) by going to Settings and Preferences on the left hand side of the main Connect home page and then Print View. But be aware that this will also print on canvass cards
1. Begin on the My Voters or My Campaign side of the database
2. Go to your list
Go to a list you have created or create a list from scratch.
3. Go to the letter
Click on the Letters icon.
4. Setting up your letters
-
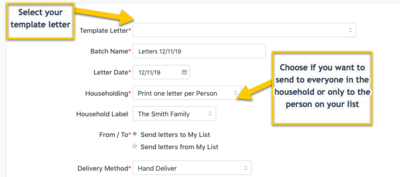
To send a single letter to all the voters in My List, simply choose the Template Letter here
-
Give your letter batch a name. This name will be given to the PDF file containing your letters
-
You can change the date that will be printed on your letter (the date can be excluded in your template letter settings)
-
The householding options allow you to choose whether you want one letter per voter, or one per household. You can also choose a label to apply to larger households
-
If you select Hand Delivery as the Delivery Method, the Walk Code will be printed by the address
-
You can set the sort order below so that they will be printed in an order that allows you to more easily hand deliver them
- If you have walks set up in Connect then choose Polling District followed by Default Walk to start with
- In some places the next best thing to sort on is Polling Number which will print the letters in the order that voters appear on the electoral register
- If that doesn't work for you, then sort by Street Name
- After that you can sort by Walk Manager Order if you have sorted your streets in Walk Manager, or Street Number for them to come out in numerical order, or Odds / Evens and Street Number if your streets are typically divided into odd and even numbers
NOTE: If you want to print different letters to different groups and have them printed in delivery walk order, then at step 4 choose Branch By Target from the template letter drop down menu. A new drop down will appear that will allow you to choose the target pool you want to use to split your letters - e.g. Labour Facing or Tory Facing. After you have completed the settings on the rest of the page hit Next and then you will be given the chance to select which letter should be sent to which target pool sub-group. Then continue the process as below.

5. Set the letter signature
Next, you need to set the signature. You can change the sign off as well as including the senders name and title. If you want to include a PS, it needs to be added to the Template Letter.
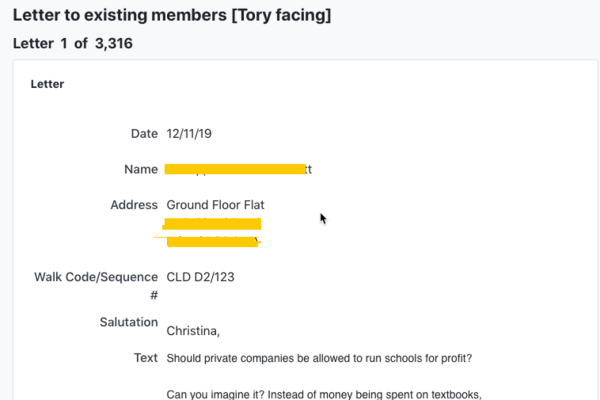
6. Get a preview
- The next screen allows you to preview your letters
- Check that everything looks good and make sure to make any changes if you need to before printing the entire batch
- The fields on display are editable. However, if you change anything here, it will only affect each individual record. To make changes to all the letters, you will need to edit the original template used
7. Printing the batch
- When you are happy with your letters, click ‘Save and Print Batch’
- You will get the option to add a contact history to all the records in your batch. If you would like each voter record to show that this letter was printed and when then choose Yes, otherwise choose No
- You will then see a screen telling you that your PDF is being created and will be available to download from the My PDF Files screen
- You can access this directly from the My PDF link on the page or from the Admin panel of the Main Menu. You can return to download your PDF at a later time
- If someone else is going to be printing the letters for you, you do NOT need to download them and send them via email. Instead, just instruct the user who will print them to log into Connect, go to My PDFs, select your name in the 'Created By' drop down menu, and download the file from there. If you do send a batch via email, the file MUST be encrypted and password protected for data protection compliance