Managing Reports
Lighthouse Training - Module 13
Time estimate: 8 minutes
Topics: Lighthouse, Lib Dem systems and tools
In Lighthouse, you can create reports to save your filtered data.
There are some reports we think you will need a lot already created for you in Reports.
However, you might need to create a report of your own. This module will cover how to create, save and download reports.
Creating reports
Step 1
Click on "Contacts" in the blue menu at the top.
Step 2
You will be directed to the Contacts page. From here, you can view a list of all contacts - that is, members, supporters, and donors - for your local party. To create a contact report, click the “Filter” button at the top left of the page. A pop-up window will appear.

Step 3
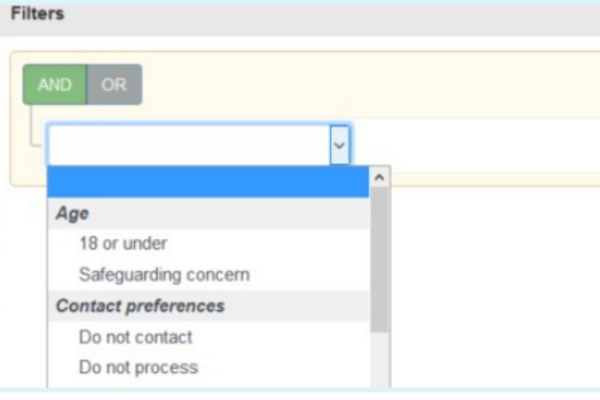
Next, you will need to create a series of “rules” for Lighthouse to follow, which allow it to select the correct people from your contact list. Click into the drop-down list (located underneath the green “AND / OR” buttons) and select a group of contacts you want to include in your contact report.
As an example, let’s say you want to make a report showing all contacts in Dalston ward.
Step 4
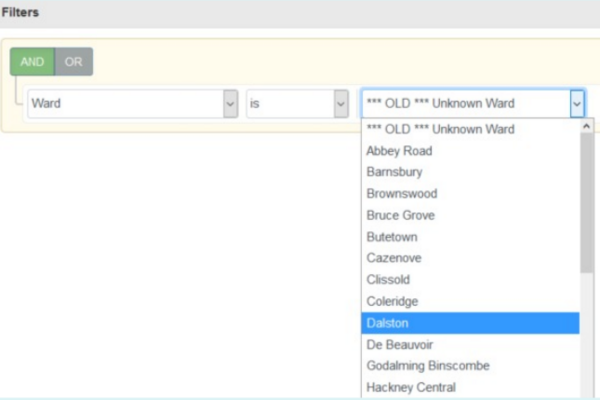
Select “Ward” from the first drop-down menu, then choose the ward from the drop-down menu which appears.
Step 5
If you want to make your report more specific, you can add additional rules by clicking “Add rule” or “Add group” at the top right of the screen and repeating the process in steps 3 and 4.
For example, this is telling Lighthouse to:
- Filter your contacts so that the report only shows the group of current active members
- Then filter that group so that it shows only those currently active members living in Dalston or Hackney Wick
Remember to select the correct AND / OR options here - otherwise, you may end up with no data in your report. In this example, a report of all current active members living in Dalston and Hackney Wick would be empty, as each contact can only live in one ward.
A group will apply the same logic across the the filters, all filters in that group will be AND or all OR. A rule allos you to change this logic for each filter.
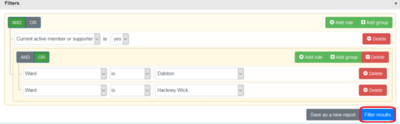
When you are happy with your filters, click “Filter results”.
If you intend to contact the people listed in your report, make sure to add this rule: This ensures that you will only get in touch with people who have opted into communications.

If you intend to contact the people listed in your report, make sure to add this rule: This ensures that you will only get in touch with people who have opted into communications.
Step 6
A filtered list of your contacts will appear. If you would like to change your filters, click again on the “Filter” button at the top of the screen. You can then edit your filters within the pop-up menu.
If you click away from the contacts page, you filters will remain until you clar them.
Step 7
Once you have finished updating your filters, click “Update filters” to view your contact report again.
Step 8
You can save your report in order to view it again at a later date. To do this, click “Save as a new report”

Step 9
You will then need to type a name for your report.
You can view your saved reports in the Reports tab.
Downloading reports
Once you have created your reports, you might want to download them. You should only download a report if you need to, for example, you are uploading the data to an email platform.
If you are downloading the data to share with another member of your executive, you should just send them a link to the saved report, rather than downloading it.
Step 1
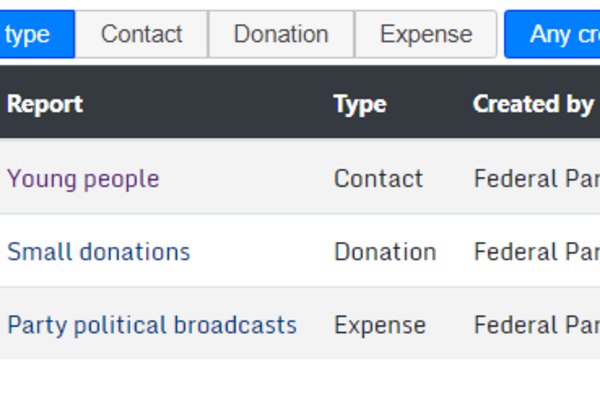
Locate the report you want to download in the Reports section of Lighthouse. Select the report by clicking on its name. For example, if you wanted the young people report, you would need to click young people.
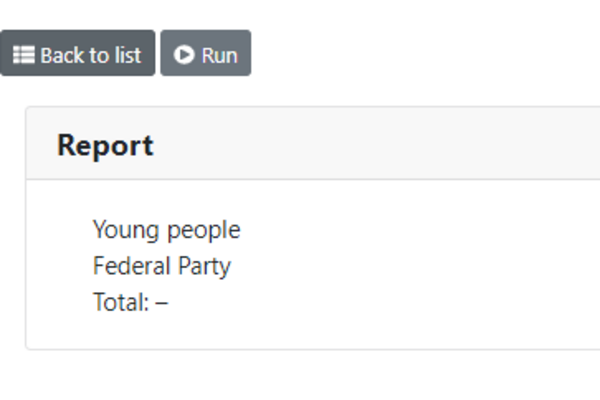
Once you are in the report, click run.
Step 2
Once you are in your report, click “Download” at the top left of the page.
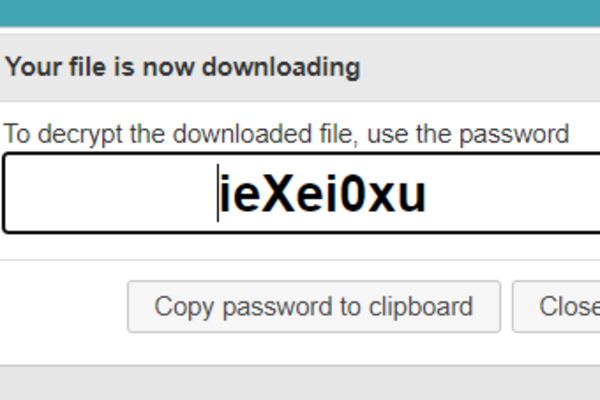
Note that you can download data any time you see this button in Lighthouse. A pop-up with the password to the report will appear. Do not close this without copying the password. Once it is closed, it cannot be retrieved and you will have to download the report again.
Step 3
Locate the downloaded file in the file explorer on your computer. It is likely to have been downloaded to the “My Downloads” folder unless you have changed this option in your browser settings, and will be named “export.zip”. Double click to open the zipped folder, and you will see three files - an Excel spreadsheet, a CSV file, and a text README file.
Note that if your download contains a very large amount of data, you may not receive the Excel file.
Step 4
Due to the personal nature of the data being handled by Lighthouse, you will be asked to enter a password when you open any of the files that are downloaded.
Paste the password when prompted and you will be able to view your downloaded data.
Tasks
Tasks are quick and easy things you can do after each module to help practice what you've learned. Try them out and see if they help!
|