Walk Manager
Connect Toolkit
This guide will show you how to cut and edit your delivery walks within the Walk Manager. You need to create ‘Walks” in the Walk Manager in order to print Cover Sheets for your leaflet bundles. You can also use the “Walks” to order when printing out letters and Canvass Cards and you can search on them in Create a List. The Walk Manager button is in the central column of the Main Menu screen.
1. Begin on the My Voters database
2. Cutting walks
- To Cut Walks, go to Manage Walks on the Connect home page and then click on Walk Manager.
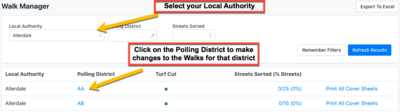
- Select your Local Authority to find all the Districts there.
- Click on the Polling District in blue to find the walks for that district
- At the bottom of the screen click the ‘Cut District Walks’ link (or Edit All Walks if some walks have already been cut)

- A map will then load showing the properties in the polling district, simply click once to add a node to a shape and keep clicking until the shape encircles the properties you want in the first walk (don’t drag).
- To close the shape, simply click on the first point again
- Click Save regularly
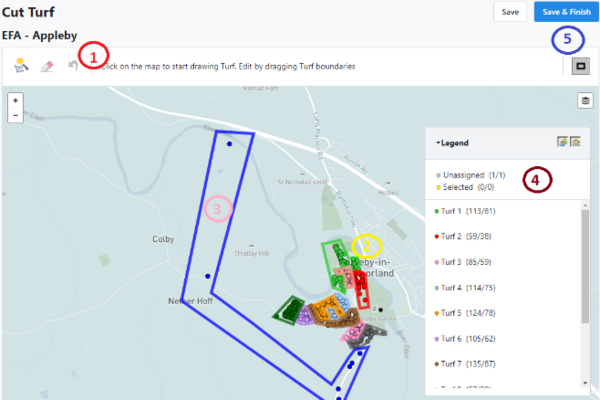
Image guide:
- The undo button here will undo your last action. The eraser button can be used to erase all walks and start from scratch
- Turfs can be shaped to match the area they need to cover that are easy for delivers to walk taking local knowledge into account.
- Rural area should be grouped together and will cover larger areas with smaller number of homes
- Make sure all homes are assigned before finishing
- Remember to save regularly as it will not automatically save any changes made
Top tips
- If you can't save your turfs (the button is greyed out) check that you don't have any turfs with zero houses in - if you do, delete them.
- Don't have more than one Connect log in open when editing walks - this is the easiest way to have the system wipe them all
- You must resave all your walks after the register update each month - otherwise new houses on the register will not be assigned to a walk, causing issues with direct mail exports an lists created based on walks. As part of this process, you may have an annoying new unassigned house that is hidden by the lines of a turf. To find this black dot, create a new turf that covers the entire area - you will see the unassigned houses switch to zero. you then need to follow a process of zooming in, and making the area covered by your last turf smaller until you have an unassigned house again - at which point you should be able to find it somewhere in the area you just uncovered. You can then delete your last turf and you amend the existing turfs to cover that final black dot.
3. Walk list
- When you have created Walks in a Polling District, they will be displayed in a table at the bottom of the Polling District screen.
- From here, you can edit them, print cover sheets or print canvass cards. You can click the walk name to edit its details, or click ‘Edit All Walks’ to change the walk boundaries.
4. Editing walk info
- To edit a Walk’s information, click on its name in the Walk List on the Polling District screen. You can give the walk a different name, specify a number of leaflets and add codes to indicate what type of terrain the walk covers or notes about specific addresses.
- You can also assign a deliverer and wholesaler to the walk by searching for their name in the box that says Last name, First name. To ensure your activists are available in this box, you first have to make them a Canvasser/Deliverer in MyCampaign
- To do this, you need to locate a volunteer's MyCampaign record, click on the VAN ID tab, and then where it says "Canvasser / Deliverer", click the "Add New" link and then either select their name if it appears (this will only happen if they are a Connect User) or click “Add new Canvasser/Deliverer”. Once you have done this, their name will be selectable. If you change details on a deliverers record in My campaign such as phone number or email, you will need to click “update” in order for these new details to show on a walk sheet
5. Walk cover sheet
- You can print out Walk Cover Sheets for all the Walks you have created. You can either print these individually from the Polling District Screen, or for a whole polling district from the main Walk Manager screen. In either case, they are created as PDFs that can be downloaded from the ‘My PDFs’ page, accessible from the box on the upper left hand of the Connect home page. The PDFs remain there for 30 days and can be accessible by any other Connect users in your local party (as long as they know that it was you who created them) so there is no need to email walk cover sheets across to people.
6. Analysing Walk Coverage
- The LibDem Software volunteers have built a tool that allows you to easily analyse the data from your walk cover sheets in a spreadsheet. Simply download your walk pdfs and upload at https://ldwalks.azurewebsites.net to create spreadsheets that show details of individual walks and individual deliverers/wholesalers
- Dashboard (available to campaign managers via your HQ campaign staff) also has summary stats on walk coverage at a glance so you can target your search for deliverers
- You can create lists of every deliverer/wholesaler in an area in My Campaign by ticking the box marked “Deliverers” or “Wholesalers” (or both) in the Volunteers tab of create a list.
- You can also create lists of volunteers who have offered to deliver but not been assigned a specific walk by creating a list based on the relevant volunteer question, and then removing people using the “Deliverers” and “Wholesalers” group.