Bulk Uploads
Connect Toolkit
This guide will show you how to upload data from a spreadsheet or data file into Connect, as well as apply data to a list of people you create within Connect. The most common external data you will want to import are Postal Voter lists and Marked Registers. Internally, you may wish to mark people with a particular tag, or apply a suppression to them (e.g. do not phone). You can perform ‘Bulk Uploads’ from the right-hand side of the Main Menu Screen in the Enter Data section or from the icon bar on the My List screen (for internal ‘uploads’.)
It is important to follow these steps closely as any mistakes when uploading data can be difficult to reverse and can have big impacts on the system.
PLEASE NOTE: It is NOT necessary to apply a question response or tag to a voter for admin purposes. Saved Lists perform the same function. For example, if you want to be able to make a list of all the voters in an import file, there is an option in Bulk Upload to load them as a Saved List into one of your existing folders. Then you can not only look at that list again at any time, but you can also use the My Saved Lists tab in Create a List to add it to, remove it from or narrow any other list or search you may have. You can even share your list with others if they need to do the same thing.
Before you get started, it is important to note that the data file must be saved as either a comma or tab-delimited file (CSV file). It must contain fixed columns (i.e. the same data fields are always in the same columns). Council’s can often make errors with their files such as including commas in the addresses of Voters. This will lead to the addresses spreading into other columns and shifting the important data out of order. If this happens you will likely need to correct this by deleting the incorrect columns. However, if the Polling District (PD) or Poll Numbers (PN) are mixed into other columns you may need to manually reformat that data or request a new file from your council with the addresses correctly formatted.
You should also ensure that the name of the file you are trying to upload is alphanumeric (only contains letters and numbers), as Connect will not take uploads with special characters.
It is also very common that the Polling District and Poll Number will be combined into one column. You can use the text to columns feature in excel to split the PN and PD’s into separate columns for upload.
The file must also contain EITHER:
A. A column containing VAN IDs for each record; or
B. Two columns, containing a Polling District code and a Poll number for each record - they cannot be in the same column! If they are, you can use Excel's Text-To-Columns feature, under the Data tab to separate them out
1. Begin on either the My Campaign or My Voters database
Users with the appropriate level of access may have the ability to bulk upload on either sides of the database.
Click on ‘Choose File’ and navigate to your data file and tick the box to indicate if your data file has a header row. When you are ready, click ‘Next’.
Your file will be uploaded for processing, and a sample of the data will be displayed.
2. Uploading your file
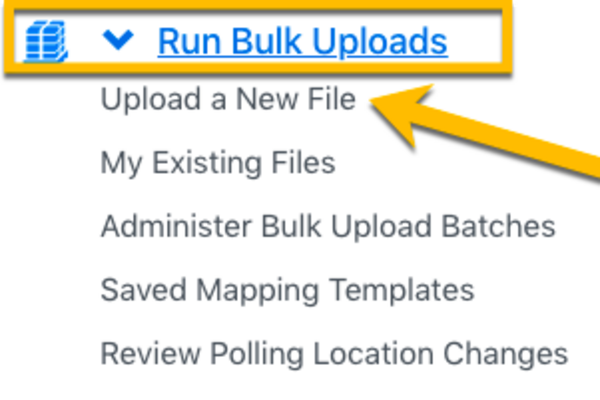
To upload your file, click on ‘Run Bulk Uploads on the Main Menu then click ‘Upload a New File’.
Click on ‘Choose File’ and navigate to your data file and tick the box to indicate if your data file has a header row. When you are ready, click ‘Next’.
Your file will be uploaded for processing, and a sample of the data will be displayed.
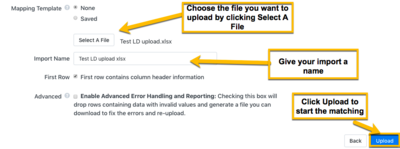
Note: It is NOT advised that you use the "Advanced Error Handling and Reporting" option as this will not tolerate files with significant numbers of blank cells
3. Matching the Records
To match the records, you need to select either Polling Number or VAN ID in the ‘Apply New Mapping’ drop down menu as the first step
If you select Polling Number, you will need to enter the name of the Local Authority, then select the columns that contain the Polling District and Poll Numbers
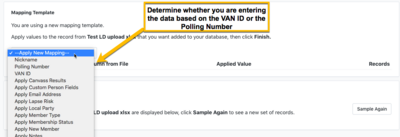
If you select VAN ID, you will only need to select the column containing the VAN IDs
Note: If you fail to complete this step before apply other mappings then your upload will fail
4. Determine what type of data you want to upload
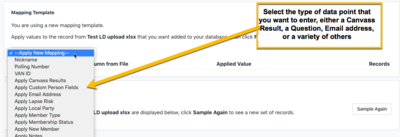
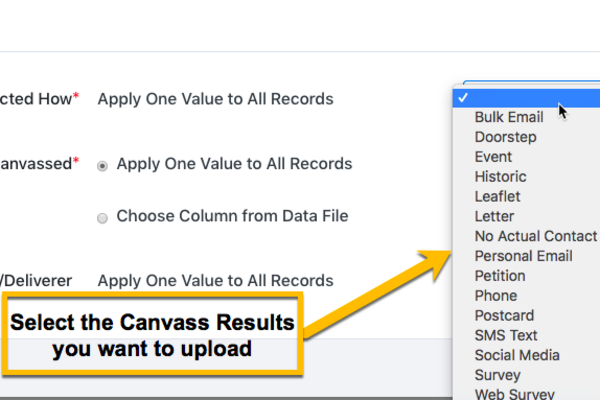
Apply Canvass Results
This upload option allows you to mark all the voters in your list with the same Canvass Result (Not Home, Do Not Phone, etc). You must select a canvass type, and enter a canvasser and date.
Adding contact details
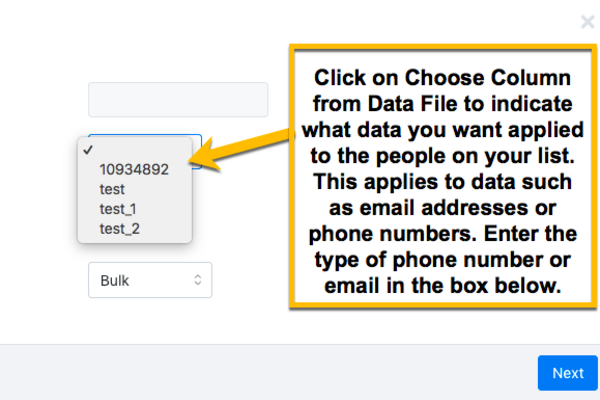
You can use the bulk uploader to import email address and/or phone numbers. Simply select Apply Email Address or Apply Phone Number from the Upload Options drop down menu.
In both cases you can either apply the same address or number to all those in your list or choose a column in your file containing an address or number for each record.
For phone numbers, you will either need to apply a type or select a column containing the phone type for each record. Be aware that phone numbers of an incorrect length will not be imported - this is especially relevant if you have opened your file in Excel first and it has stripped the leading zeros off all the phone numbers because they will now be one digit too short and will therefore be ignored.
Applying Postal/Proxy vote data
- You will need to upload your own postal voter files supplied from your council. You will need to select the Upload Option ‘Apply Postal / Proxy Vote data’. There are a number of options within this, but the one you want is called ‘Ballot Type Name’.
- Select ‘Choose Column from Data File’ and then select the column containing the vote type (Postal, Proxy etc).
- On the next screen you will see a list of all the different values in the column you selecte
- Use the drop down menus to select the matching value in Connect (Postal, Proxy etc).
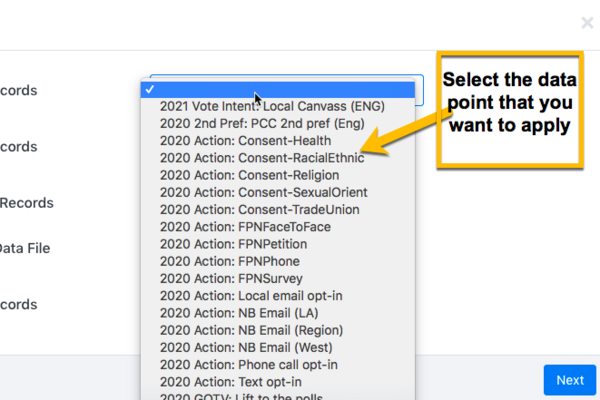
Apply Survey Responses and Tags
These options allow you to apply a Tag or Question Response to voters. You can either apply the same to all, or select a column to match results (see Postal Votes section above).
With tags, you simply need to match the tag(s) you wish to apply. For Question Responses, you will need to select a question before you can select or match your response(s).
You will also need to select or match the contact type, date and canvasser.
Upload to a Saved List
At the bottom of the Apply New Mapping drop down menu is the option to load every record in your import file to a saved list for future reference. This is particularly useful for working out who has been added to or removed from the list of postal voters for example. So it is a useful habit to get into to consider doing this in addition to your other steps.
Uploading Marked Registers
Please see the full guide on Marked Registers for more information. It can be found here. This will be a very brief overview of how to upload MRs.
You should use the Marked Register export file to record who voted and who didn't as it will allow you to be able to match on VAN IDs in bulk upload. After matching voter records to the VanID’s you can then proceed on to uploading the file. Where you can designate which column contains the VAN ID, you then get the option to upload data to the Vote History. You'll be presented a box into which you should type the year of the election concerned, then options for the different types of election will appear.
On the next page you can choose the column which indicates if a voter voted or not and on the final page you will define what the values in that column mean. PLEASE NOTE: The term Absent refers to an Absentee Ballot or postal vote. If someone didn't vote their record should be left blank - please ONLY apply the value Absent to people who you know used their postal vote
If you receive a data file of those who used their postal vote at an election from your council, then you can upload that to Connect, but you will have to match the polling number and polling district columns and upload the file as a Saved List first (see above). Once you have done this, you can inspect the data in My List, before exporting a list of VAN IDs. Then you can upload that list of VAN IDs into the vote history. This may seem convoluted, but there is a good reason for it! Polling numbers change every year, and sometimes more often than that. You need to make doubly sure that the poll numbers in your file match those in Connect before applying data to the vote history, because it is not easy for us to remove it if you make a mistake.
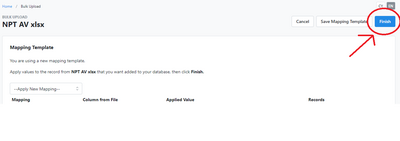
5. Completing the match
You can apply as many of the above options as you need to your file.
Once you have selected all the data you want to upload, click Finish.
6. Administrering bulk uploads
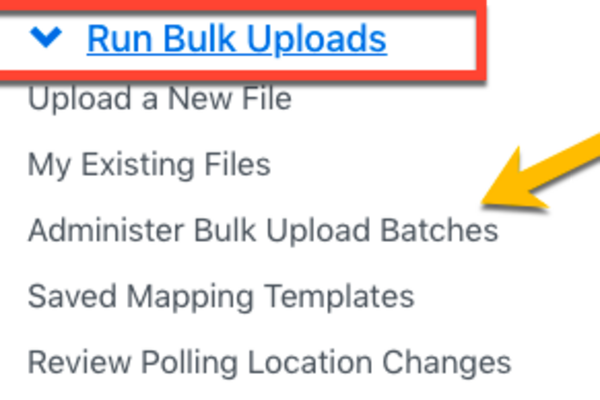
Return to the Main Menu, click Run Bulk Uploads, and then click ‘Administer Bulk Upload Batches’.
You should then see your upload on the screen
You need to click on the blue ‘Match People’ link on the left hand side - if this isn’t a link, wait a minute or two then click refresh. The larger your file is, the longer it will take for the link to appear
Connect will show you how many of the uploaded records it has matched to voters in the database. You can then choose to export back out the records that did not match if you want to try and work out why that was the case. They may include people who have moved or aren't in Connect because they appeared on the register very recently or because they live abroad. If the number is very high, it is likely that there is something wrong with your file so you should cancel the upload and inspect your input file more closely
Click next, then approve the processing of the rest of the records. You can then check the progress of your upload on this screen
The ‘View’ drop down box at the top will allow you to see completed batches instead or as well as incomplete ones. You can also see past uploads done by other members of your local party