Managing Candidates & Selection
Lighthouse Training - Module 15
Time estimate: 7 minutes
Topics: Lighthouse, Lib Dem systems and tools
You can now view your upcoming elections and add selections on Lighthouse. You can do this for elections at all levels and track the full selection process.
If only you have access to a local party, you will only be able to add the selection process for local elections. If you have Regional access or higher, you will be able to add Westminster, Devolved Region, Senedd or Scottish Parliament selections as well.
If you have local access, you will still be able to view all the selection processes in your local party, but you won’t be able to edit them.
Understanding Electoral Areas
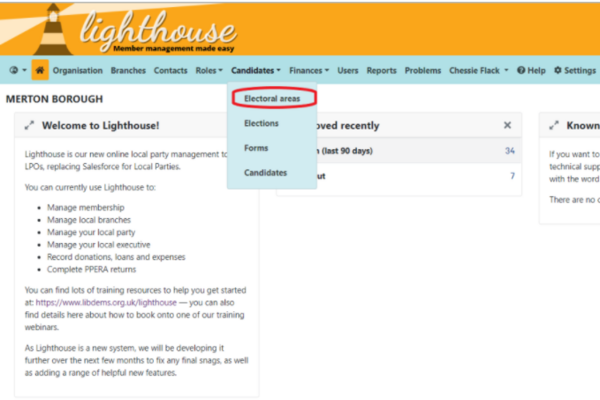
Step 1
When you log into Lighthouse, you will be taken to the dashboard. Click on “Candidates” in the blue menu at the top; then select “Electoral Areas” from the drop-down menu which appears.
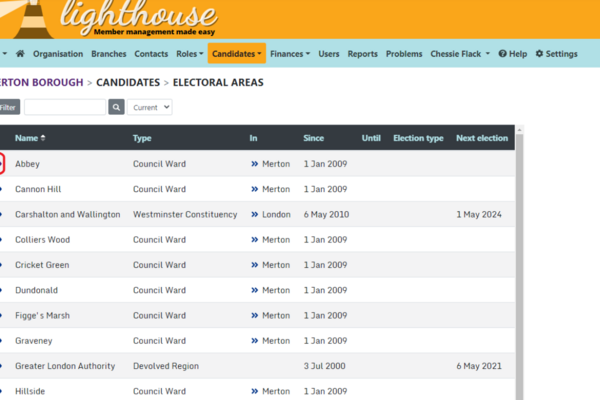
Step 2
You will be directed to the Electoral Areas page, where you can see all the electoral areas in your local party.
Step 3
To view the boundaries of the electoral area and add an upcoming by-election, click the eye icon on the left of the list.
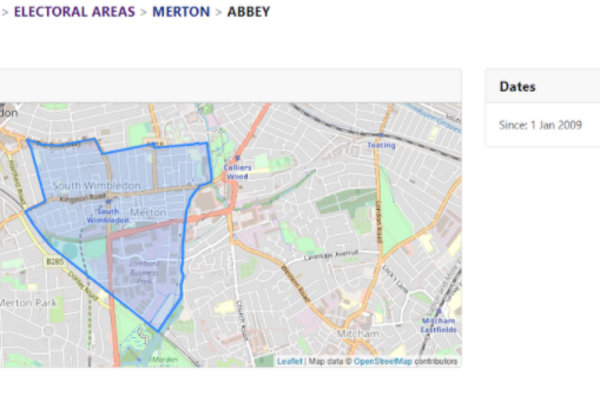
Step 4
You will be directed to the page for that ward. These will show all the electoral areas, from the council ward up to the Westminster constituency. Here you can also see the dates when the area was created and the date of the next election for that area.
Adding a By-Election
Local parties are responsible for adding in scheduled elections and by-elections happening in their areas. If you are a local user, you will only be able to add local elections, you will need to be a regional user or higher to add other elections.
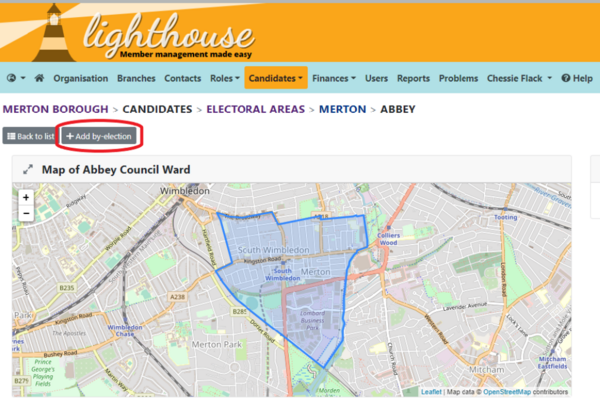
Step 1
To do this, click on ‘Add by-election’
Step 2
You will then be directed to the new by-election page. You will need to work through each of the questions to add your by-election.
Step 3
Add the date of the by-election. You can do this either by typing the date in the box, or clicking the calendar icon and selecting the date.
Step 4
Select the correct electoral area for the by-election. This will automatically be filled in as the electoral area you clicked the icon for.

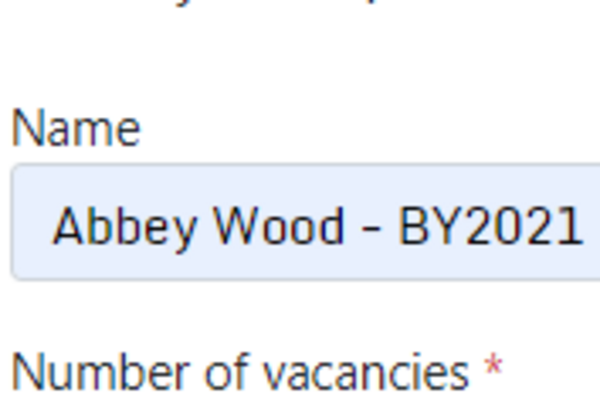
Step 5
Add a name for the election, so you can easily identify it in the list of upcoming elections.
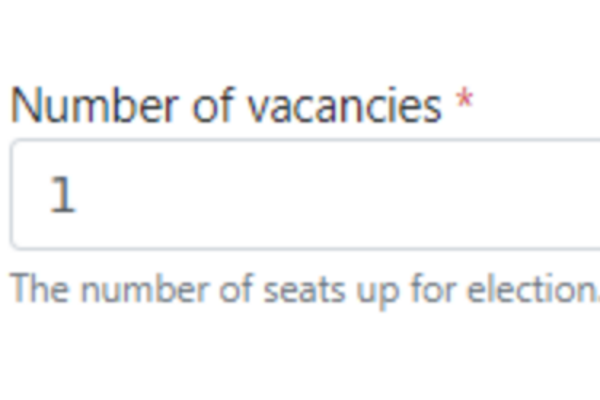
Step 6
Select the number of vacancies that need to be filled. This will usually be one, but if you have multiple councillors step down in a multi-member ward, you will need to change this.
Step 7
Add the key dates for the by-election, this includes the date nominations close, when the spending return is due and when the term ends. You can do this by typing in the dates, or selecting the dates by clicking the calendar icon.

Step 8
Once the by-election has happened, you will need to add key numbers for the election. This including the size of the electorate, the turnout and ballots spoiled. It is not a problem if you don't know this information, but it is useful to add if you do to track for future elections.

Step 9
Once this is done, you will need to click ‘save’ or ‘save and add another’ if you have multiple upcoming by-elections
Adding a Selection
You can now add your selection processes to Lighthouse. If you have local party access, you will only be able to add the selection process for local elections. You will be able to view the progress of other selection processes, but not the details.
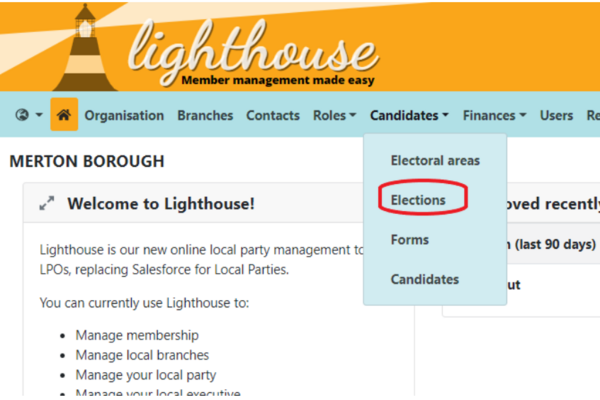
Step 1
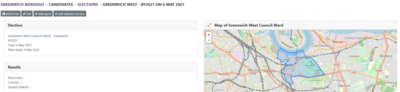
When you log into Lighthouse, you will be taken to the dashboard. Click on “Candidates” in the blue menu at the top; then select “Elections” from the drop-down menu which appears.
Step 2
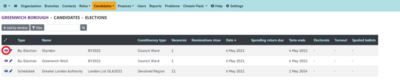
You will be directed to the Elections page, where you will see all the upcoming elections in your area.
Step 3
To add a new selection process, click on the eye icon on the left of the list for the election you want to add a selection for. As a local user, you will be able to view other upcoming elections, but you will not be able to add a selection process.
Here you can view all the details for the upcoming election, including the boundaries, date of the election and the date of the spending returns.
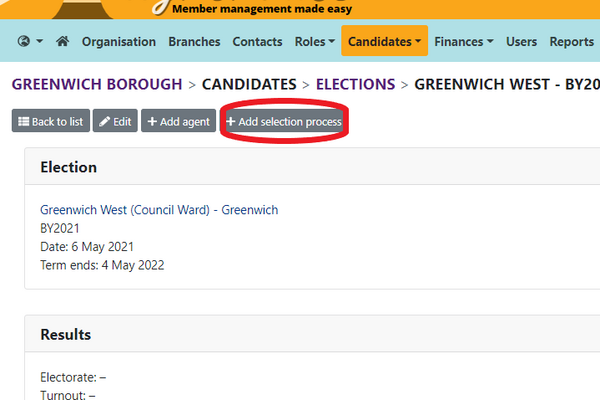
Step 4
Click ‘Add new selection process’ to begin creating your selection process.

Step 5
Select what type of selection you are holding. The options are: Full, Held, Snap, Paper, License
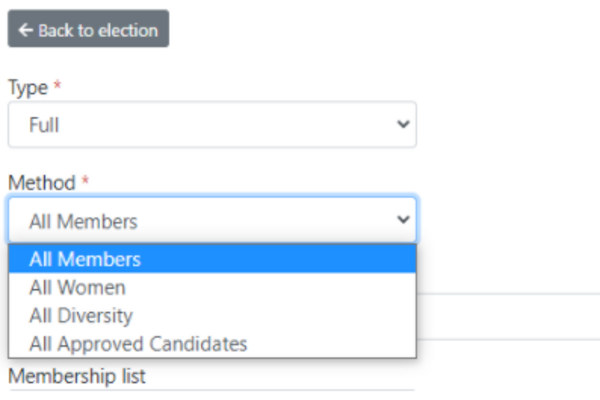
Step 6
Select what method you are using to select your candidates. Can all members apply, or is it only open for diversity lists, such as Candidates with a disability only?
Step 7
Then select which form you will be asking the applicants to complete. There will be standard ones preloaded, but if you want to add your own, you can create one in forms. You can find guidance on how to do this in the forms section.
Step 8
Choose the date you want to be the cutoff date for your membership list. This will be the date people will have to be members in the constituency to vote in the selection process. This should be the same date that your advert goes live, but always check ith your returning officer.
Step 9
Select the date the advert goes live, and the date that it ends. Adverts are usually up for two to three weeks. You must ensure these dates have been agreed with your returning officer.
Step 10
Enter the date of your hustings.
Step 11
Then click ‘save’ and you will be taken back to the selection page, where you can view the details for the selection.

Adding a Shortlisting Committee
For a selection, you will need a shortlisting committee, who will be responsible for shortlist the candidates.
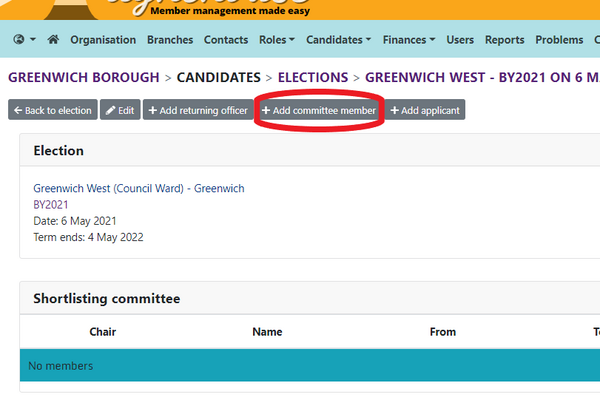
Step 1
To add a member of the shortlisting committee click ‘Add committee member’ at the top of the selections page.
Step 2
You will be directed to the new committee member page.
Step 3
To add the member, type their name into the Member box. This will generate a list of members, from which you can select the correct member. Members within your local party will appear at the top of the list. If a member is not in your local party, you can still add them to your shortlisting committee.
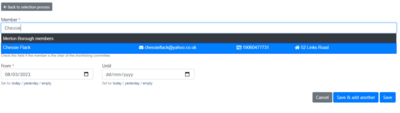
Step 4
If the member you are adding is the Chair of the shortlisting committee, you can tick the box that says ‘Chair’. You can only have one chair of each shortlisting committee.
Step 5
Select the start and end dates for the shortlisting committee to be in the post. You can do this by typing in the date into the boxes, or by clicking the calendar icon.
Step 6
To add the member, click ‘Save and add another’ to save and add another member.
Once you have added all the members of your shortlisting committee, click ‘Save’ to be taken back to the selection page.

Step 7
To view the selection, click the link with the details for the selection.

Adding an Applicant
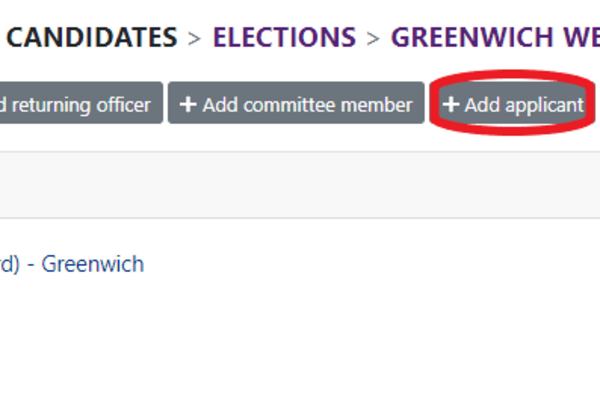
Step 1
Click ‘Add applicant’ at the top of the selection page.
Step 2
To add a member as an applicant, type their name into the Member box. This will generate a list of members, from which you can select the correct member.
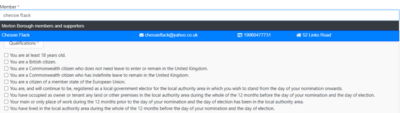
Members within your local party will appear at the top of the list. If a member is not in your local party, you can still add them as an applicant.
Step 3
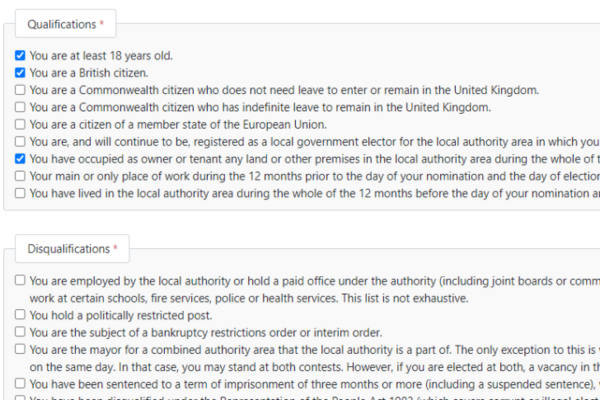
Go through the lists of qualifications and disqualifications and tick any that are applicable. This will let you know if that member is eligible to stand in the selection.
If they are not, a warning will appear to let you know they are ineligible. You will still be able to add them as an applicant, as they might be able to become eligible.
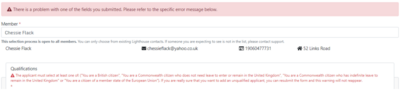
You can add comments at the bottom of the page, be aware that these can be made public in response to a subject access request.
Step 4
To add the member, click ‘Save and add another’ to save and add another applicant.
Step 5
Once all the applicants and shortlisting committee members have been added, you can move the applicants through the selection process.

The Selection Process
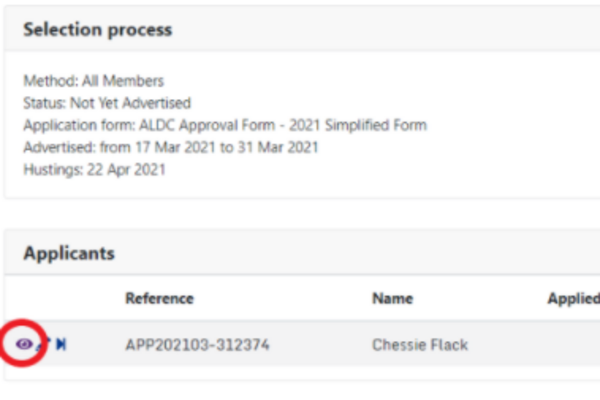
Step 1
To view the details of the applicant, and to move them through the selection process, click the eye icon next to their name, on the selection page.
Step 2
You will be directed to the Applicant’s page. You can see where the applicant is in the process in the bar across the top.
Step 3
Once you have received the application from the applicant, click ‘continue’.
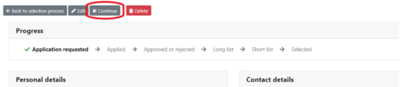
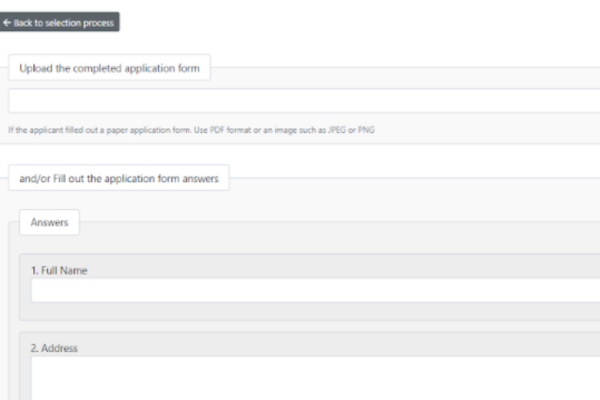
You will be directed to complete the application form. You can upload this as a PDF or copy the answers of the applicant into the form.
Step 4
Click ‘Continue’ at the bottom of the page to add the completed form. You can add comments at each stage of the application.
This will direct you back to the applicant page. You will be able to see the progress of the applicant in the bar across the top.

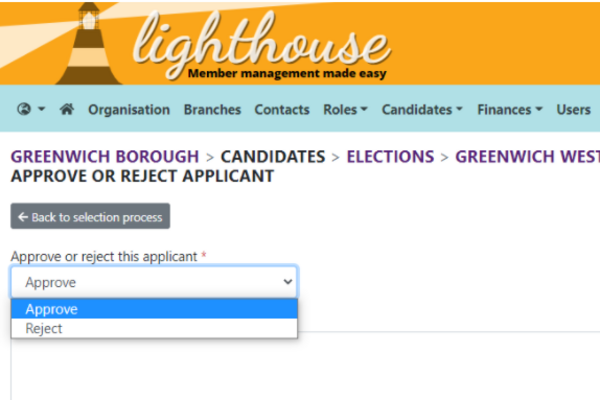
Step 5
Click ‘Continue’ to add whether the application has been approved or rejected.
If the applicant has been rejected, state why in the comments box. Again, be aware that comments may be made public in response to a subject access request.
Step 5
Click ‘Continue’ to add whether the application has been approved or rejected.
If the applicant has been rejected, state why in the comments box. Again, be aware that comments may be made public in response to a subject access request.
Step 6
Click ‘Continue’ to go back to the applicant page.
Step 7
If the applicant has been approved, you will then be able to add the applicant to the long list, by clicking ‘Continue’.
At this stage you can add any useful comments on the applicant. Click ‘Continue’ to go back to add the applicant to the long list and go back to the applicant page.
Step 8
Once the applicant has made it to the long listing stage, they will have an interview conducted by the shortlisting committee.
If the applicant is successful in this interview click ‘continue’ on the applicant page.
If the candidate is not successful at the interview stage, leave the candidate as they are and do not click continue here.
Step 9
Upload a PDF of the completed interview checklist, so you can see if the applicant has been successful and any useful notes on the checklist.


Step 10
Select which members of the shortlisting committee are on the interview panel. Only members of the shortlisting committee should be interviewers.
Step 11
Select ‘Continue’ if the applicant passed the shortlisting interview, to add them to the shortlist.

Step 12
Once you have your list of shortlisted applicants agreed with the Returning Officer and listed here, your RO will be able to open the selection to members to vote. When this has been completed, a winner has been declared, and any appeals are over, click ‘continue’ on the successful applicant.

Step 13
You will be directed to the page to confirm this applicant has been selected. Here you can add any comment about the successful applicant.
Once you click ‘Continue’ here, this applicant will become the selected Candidate.
Step 14
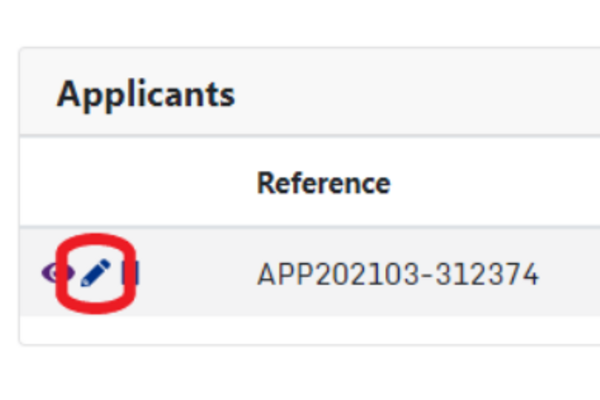
At any point, throughout the process if you make a mistake you can edit the applicant’s information by clicking the pencil icon next to their name on the selection page.
Step 14
At any point, throughout the process if you make a mistake you can edit the applicant’s information by clicking the pencil icon next to their name on the selection page.
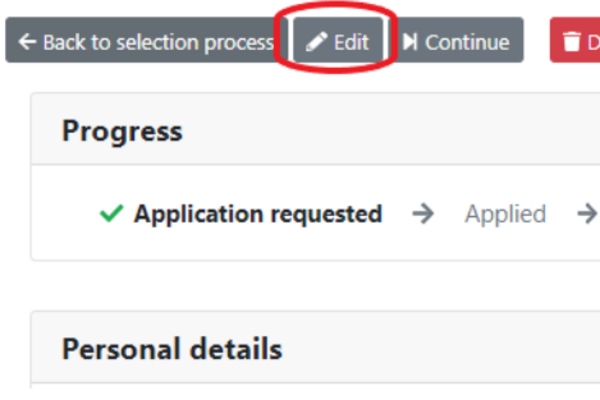
Alternatively, you can click ‘Edit’ on the applicant's page.
Approval Forms
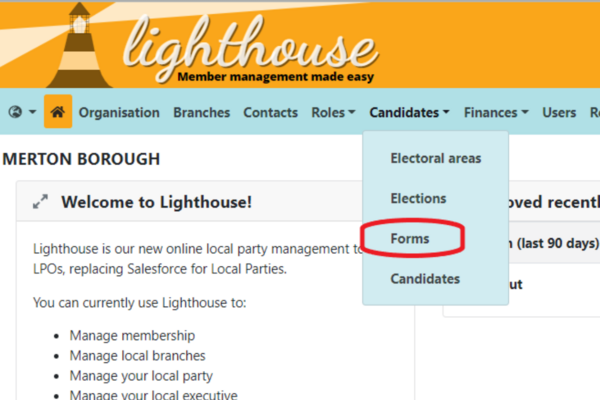
Step 1
When you log into Lighthouse, you will be taken to the dashboard. Click on “Candidates” in the blue menu at the top; then select “Forms” from the drop-down menu which appears.
Step 2
When you select a candidate, they will need to complete an application form. A series of standard forms will be preloaded into Lighthouse, so you can choose from those, depending on which form you want to use for your selection.
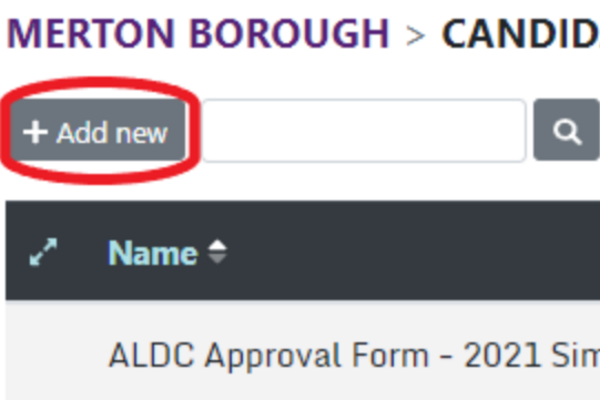
Step 3
If you don’t want to use an existing form, you can add your own by clicking ‘Add new’
Step 4
Give the form a name, so you can easily identify it in the list of forms.

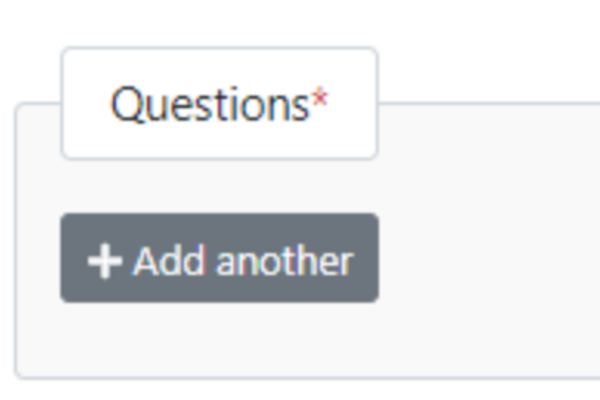
Step 5
Add all the questions you want in your form by clicking ‘Add another’
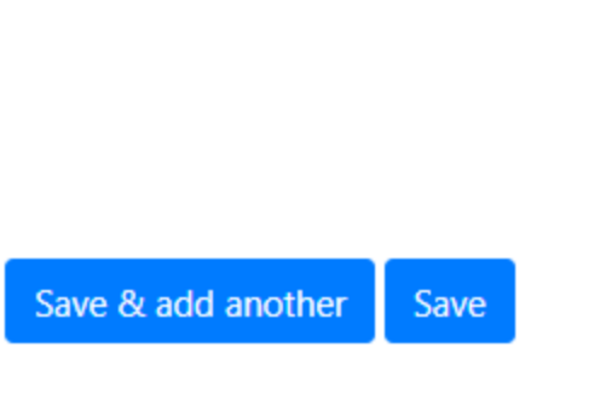
Step 6
Once you have added all the questions you need, click ‘Save’ or if you need to add multiple forms, you can click ‘Save and add another’
Tasks
Tasks are quick and easy things you can do after each module to help practice what you've learned. Try them out and see if they help!
|