Basics of Creating a List
Connect Toolkit
Lists are the starting point for almost everything we do in Connect. Whether it's a list of voters to canvass, or write to, or apply data to or analyse data from, you'll need to start by specifying the criteria for those voters and that's what Create a List is for. There are many components that can go into creating a list tailored to exactly what you want. Here is a quick overview of the different ways that lists can be created.
1. Begin on the My Campaign or My Voters side of the database

- If you are reaching out to your members, donors, email contacts or volunteers, you will begin on the My Campaign side of the database. If you want to contact your voters, you will begin on the My Voters side of the database.

2. Go to create a new list
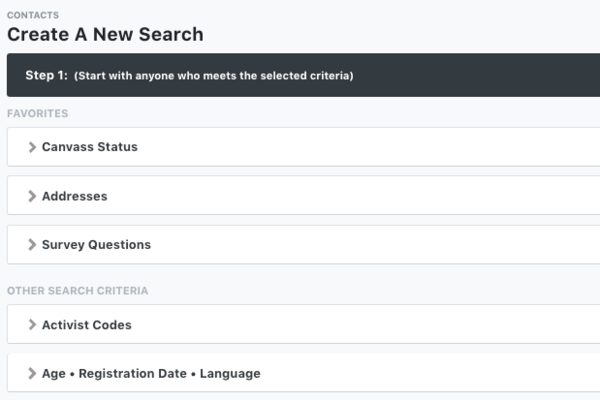
- This will take you to the main Create A New Search page, where you can choose what kind of list you want to create by selecting the criteria under the appropriate tab.
- Customise your search page by clicking on the star on the right-hand side of the box (see image above) to bring it to the top of the screen. This is very useful for tools you use often as it will make this box easily accessible to you when you need it!
3. Select the criteria for your list
There are many different boxes in the Create a List page that contain various data points, but start by looking at the Districts tab where you can choose the area that you want to make a list of:
- If you select an option from the Local Authority menu, you'll find that a Polling District drop down menu appears
- If you want to make a list of more than one ward or polling district, click on the blue word and you can use the multi-picker to choose which wards or polling districts to include
Checking your suppressions
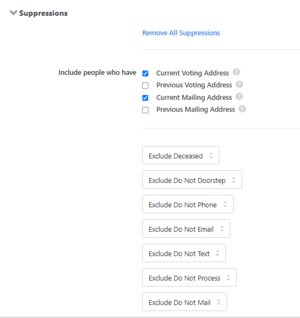
Suppressions ensure that you are not contacting people that do not want to be contacted in a specific manner. They are all selected by default so you will need to alter them depending on the purpose of your list
- Deceased: Generally, wherever you create a list, you should Exclude Deceased
- Do Not Call: If you are contacting your list by phone, you should Exclude Do Not Call
- Do Not Mail: If you are sending direct mail you should Exclude Do Not Mail
- Do Not Doorstep: If you are doorknocking you should Exclude Do Not Doorstep
- Do Not Email: If you are creating a list for Targeted Email in My Campaign, you should Exclude Do Not Email. Note that Targeted Email will not send to any records that have this suppression, even if they are mistakenly included in an email list

If you want a full list of all your members or voters and you are not creating the list for contact purposes you can click Remove All Suppressions and the suppressions will disappear. However, you should still select Exclude Deceased.
Searches can have multiple different steps, so make sure to remove the same suppressions from subsequent steps as you did in the first one.
Adding additional steps to your search
Your first step can include as many criteria from as many different tabs as you like, but you will find that it provides a list of people who fulfil all the criteria from the different tabs you select - for example, a woman who is also a postal voter who also votes Lib Dem. Sometimes you want to choose to add a different group of voters, or exclude some people who are included in your first step. That's where adding a step comes in.
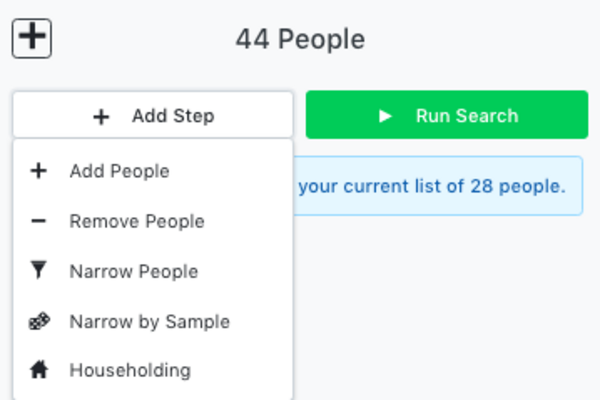
Once you have finished selecting your initial criteria, you can choose to Add, Remove, or Narrow people to your list.

- To add people to your list that did not meet your previous search criteria, click Add People and then select the new criteria for the individuals that you would like added to your list.
- To remove people from your list, click on Remove People and add the new search criteria for those you would like to remove from your list.
- To keep only those who correspond to specific criteria within your list, click Narrow People, then enter the new criteria.
Householding
Adding a Householding step allows you to alter your list based on entire households, or phone numbers, rather than individual records. There are three Householding options:
Fill Household by - This allows you to add other household members of people on your list, even if they don’t meet the search criteria. This is very useful for doorstep canvassing, as it makes it so that the full household is available for data entry by canvassers
Remove any person with a - This allows you to remove people based someone sharing their address or phone number on a different list. One example of how this can be used is to create a saved list of households that you canvassed recently, then remove any person with an address or phone number on that list, to avoid repeatedly canvassing a household where some members have already been canvassed
Narrow list to one person per - This will make it so that only one person per each household or phone number appears on your list
Continue to refine your list using the Add People, Remove People, Narrow People, and Householding functions until you are satisfied with your list.
4. Preview your list
You are also able to Preview your Results (see image above) to see the size of your list. This gives you the opportunity to refine your list further by narrowing, removing, or adding to your list as necessary before running your search. This will help to ensure you have the size of list you want.

5. Run your search
- Once you have the criteria you need and the list is the size that you want, click Run Search.
- This will load a list of people into My List. At any one time you only have one set of voters in My List, so if you want to reference it again later you will need to save it before creating a new list using the Save List As button. At that point you will have the choice to either save a fixed list of individuals that will not change, or to save the search criteria that will run next time you load the list and so pick up new data that you might have entered in the meantime - more of which later...
- However, navigating away from the page does not lose the list and clicking on My List on the main menu will always bring you back to the last list you loaded.
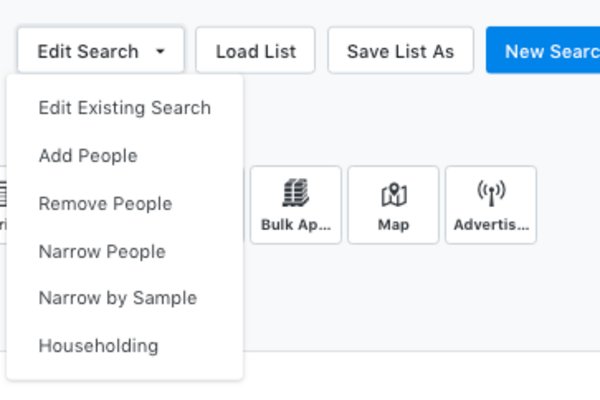
- Even after you have run your search you still have the opportunity to refine your list further if you need to using the Edit Search button in My List.
6. The My List page
This page will show you how many people meet the criteria and are found on your list, how many doors you now have to knock on to reach all these individuals, and how many phone numbers we have on file for these individuals.
You can choose to further edit your search by clicking on Edit Search, giving you the option to Narrow, Remove, or Add people to your list (see image above).
From the My List page, you can then send your list to any of the tools within the database, such as using it to set up a Virtual Phone Bank, send it to print template letters, canvass using MiniVAN or Print your list.
